What You'll Need:
A NEW SLITTER DESIGN By Ron Pedelty
-> and now... scroll down for improvements suggested by James Jones!
last updated June 22, 2002
There are many good designs available for slitting film down for use in subminiature cameras, most notably Ray Pepalis and Don Krehbiel , but none have quite the features I need. I've come up with a design in which
- the blade spacing is very easy to establish (no sanding of wooden blocks!),
- the blades use a slide-in, slide-out mount and are very easy to replace,
- the blades are ridiculously inexpensive to replace,
- it is very easy to switch among many formats, e.g. Minox, 16 mm, combinations, etc., and
- the slitter is small enough to use in a changing bag.
This last point is important to me. I don't have a darkroom, so I must either cut my film in the basement at night, or in a bag during the day or when I'm traveling. The tradeoff is, of course, that I use the "pull-through-felt" design, which is more prone to scratching than Don's, but I've never had any trouble, and, for me, that sacrifice is worth it. HOWEVER, the main feature of my design is the cutting block, and this could be adapted to Ray's design just as well.
What You'll Need:
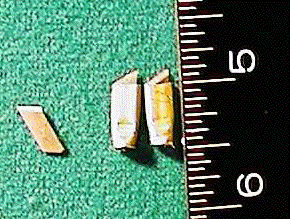
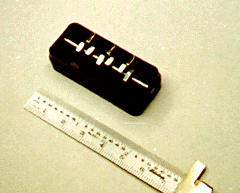
A picture showing two cutting blocks, one for
cutting a 16 mm
and 9 mm strip from 35 mm film, and one for cutting two 9 mm strips.
Step 3: Mounting The Blades:
Step 4: Making The Slitter Base:
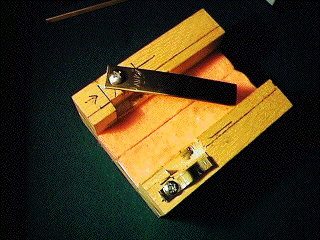
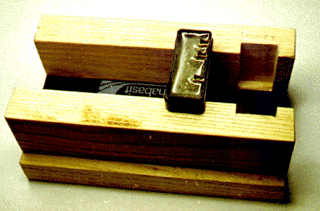
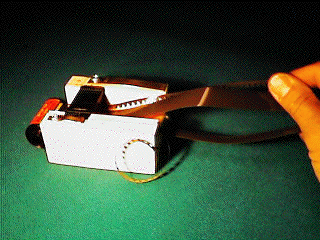
I wanted my slitter to be small enough to use in a changing bag. It consists of a "floor" covered with felt, and two "walls" 35 mm apart to guide the film. The walls have notches which allow the cutting block to seat, blades-down, low enough to just let the tips of the blades to penetrate the film. The brass bar is intended to rotate over the cutting block and lock under the brass tab. This was supposed to hold the block down with a little pressure, but in practice, I find it easier to just push down gently with my hand. The line you see down the middle of the "floor" is a thin slit cut through the felt and into the wood for the modification suggested below. Note: If you make the base before you make the cutting block, it will be much easier to correctly position the blades.
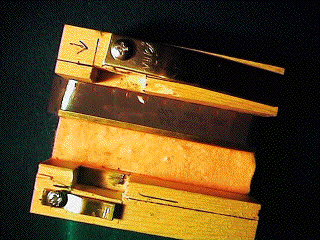
A picture showing a piece of 16 mm, perforated film heldagainst one edge of the cutting base to be slit down to 9 mm.
I cut a thin groove in the "floor" of the block, 16 mm from one
wall. Into this slot I put one edge of a short length of
"L-beam" brass, such that the other edge laps over a piece of 16 mm
film and holds it in place. I made a cutting block which slices
a 9 mm strip out of the middle of the 16 mm film. I could have
done this with a single-blade block, but I chose to use two blades so
that I could cut double-perf as well as unperforated 16 mm stock down
for Minox.
A picture showing the two-bladed block (with felt removed)and L-beam used for slitting 16 mm film down to 9 mm.
a 9 mm strip, and two strips with perforations, to be discarded. In practice, the 4 strips
would still be attached to each other where the hand is holding the leader "tongue."
The Slitter In Use:
Pull a 3- or 4-inch tongue of film out of the 35 mm cassette and
lay it out on the cutting base. Place a cutting block over it
and hold it firmly in place. (My cutouts in the base walls are
snug enough that the cutting block holds itself in place.) Turn
out the lights and P U L L!
I usually tear off the perf strips and wind the "good" strips back
into the 35 mm cassette for later use. Since the film is now
narrower than the cassette opening, I keep the cassette in a black
film can to avoid fogging.
suggested by
James Jones
James Jones (jaj01@gnofn.org, also check out his Web Page), an active participant in the Submini Listserve, found this web page and decided to try building a slitter for himself. In the process, he made some ingenious improvements, most notably a simpler and more reliable way of establishing the correct positions for the blades, and holding those positions until the epoxy has set. In addition, he was kind enough to send me photos (all taken with his "trusty Minox B. Blame the crummy scans on my cheapo Mustek scanner") and text describing the process. I have included his suggestions below, with his permission. Thanks, James!
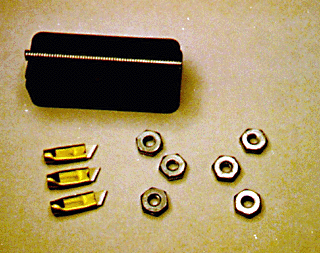
In the first picture you see the empty bottom of the film box and the 3 blade in their holders. I've taken a 6-32 screw and cut the head off while shortening it to the length of the film box, as well as the 6 6-32 nuts.
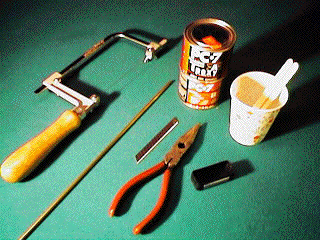
In the next picture I made a hole in each end of the film box right at the seam where it narrows. I used a hot soldering iron with a pencil tip, but a drill bit could be used as well. I threaded the nuts onto the rod, and inserted it into the holes, and dropped the blade holders in place. I measured the distances between the blades (I actually used a digital caliper, not the ruler), and, after checking and double-checking, tightened up the nuts using a small open-end wrench.
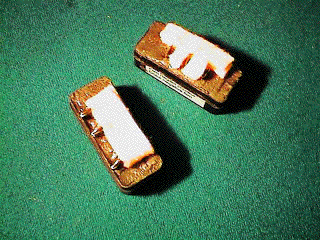
This picture shows the slitter block filled with epoxy. It's a good idea to put a bit of tape on each end to keep the epoxy from oozing out the holes. I used 5 minute epoxy because I'm impatient and it was free.The black stuff marked Habasit is a piece of conveyor belt material that I glued down with epoxy. It is basically the same as that green cutting mat that you see in the sewing department used for Olfa rotary fabric cutters. The blade block fits tight in the groove of the slitter, with almost no play.
Thanks, James!
If you have any comments or suggestions, please email me and let me know.
|
|
![]()
|
|
|
|
|
|
| This site is hosted for FREE on FreeYellow -- yours can be, too! Click here for more information. | |